Content
-
1 Making a dining table
- 1.1 Table top
- 1.2 Making legs
- 2 Conclusion
If we talk about whether it is possible to make kitchen furniture with our own hands from wood, then the answer will be unequivocal - yes, it is possible, only for this, at least, you need to be a cabinetmaker.
You probably understand that any natural wood furniture is not just knocked together (even if very firmly and neatly) box, and an artwork of an individual character.
But, nevertheless, we will consider what you can do yourself without going through special training for this.

Kitchen furniture made of natural wood. Cabinetmakers work
Making a dining table

Solid wood kitchen furniture - dining table
Of course, we will not be able to make a set, or even a wardrobe with carved elements without special training, but there are things that are less complicated.
For example, do-it-yourself kitchen furniture made of wood, in the form of a table, chair or stool, will be quite accessible for a novice master if he has the necessary tools and desire.
Read also the article “How to make kitchen furniture with your own hands. Useful Tips ”.
Table top

Pick up boards for your countertop
- So, do-it-yourself kitchen furniture made of wood will start with a simple but very beautiful dining table. Let's start with the countertop, for which we need four edged boards measuring 50x150x1000 mm. As lumber, you can choose oak or conifers, and for beginners, perhaps even preferable to pine, as easier to process and not "spinning" material.
- If the width and thickness of the boards are the same from the sawmill, then you will have to cut them in length with your own hands. Try to do this as accurately as possible so that each cut has corners. 90⁰ in all directions. If you do everything right, then you will have a 1000 × 600 mm tabletop, just right for a dining table for a small family.

The ends of the boards must be flat and smooth
- Before joining the boards in one plane, you need to process their side ends with a jointer so that they fit as tightly as possible to each other, then the tabletop will turn out to be holistic and beautiful. Try to keep the edge as flat as possible by applying equal pressure to the power tool when joining the board.

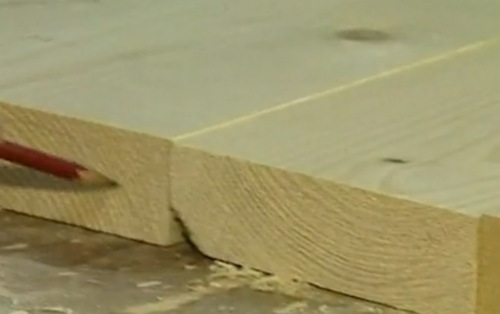
Fibers on adjacent boards should be mirrored
Council. Any wood will shrink as it dries, causing gaps in the joints. But there is one way to help minimize this effect - to lay boards with specular fibers. When sawing logs into planks, each of them has fibers arranged in cut rings, with expansion in one direction. Therefore, if one board expands downward, then the next one - upward, as shown in the photo above.

Fastening boards to dowels
- To fasten the elements together, some use screws or nails, but we will use dowels and glue, then wood furniture for the kitchen will be more rigid. We mark the side ends of the boards at a distance of 10-15 cm, but only so that they all coincide with the neighboring boards. In order not to get lost, draw a line in the center on each side end, and wrap the crosshairs with an awl or a thin curly screwdriver before drilling.
- Drill 8 mm drill holes in each side end and hammer in the dowels there, prepared in advance and previously smeared with glue. Also spread the boards with glue and knock them together so that they fit snugly against each other. Allow the joints to dry and use sandpaper to remove any adhesive that has come out.
- The knocked-down boards should be sanded again, and perhaps even go through with an electric planer or shredder to remove all the unevenness at the joints. Sand the edges of the countertop with sandpaper or a rasp, and round the corners.
DIY kitchen countertops - see here.
Making legs

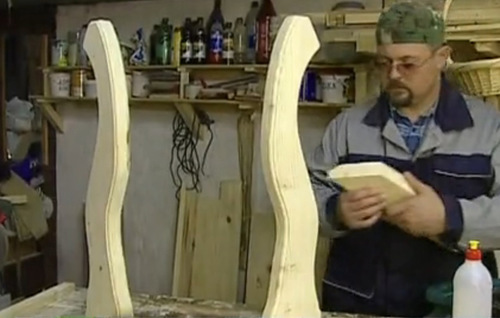
Freeform table leg
- When making kitchen furniture from wood, we do not adhere to exact patterns, so we cut a free-form table leg from the board. Further - simply - we apply the sample to the board, outline it with a pencil and cut out the second leg with a jigsaw, and so on. With the help of a cutter on the legs, you can cut out any patterns (for the sample, you should use the same part so that the rest are as similar as possible).

Connect the legs with jumpers
- Grind each leg thoroughly and start assembling them. To connect, cut out the crosspieces with oblique corners so that the legs are positioned diagonally, and sand them. The connection can be carried out with one glue, without furniture dowels, but the resulting rectangle will need to be tightened with clamps. If you watch this process on video, then everything will happen within a few minutes, but in reality you need to withstand the assembled structure for at least a day in order for it to dry.

We attach the legs to the tabletop
- When the leg structure is dry, place it against the countertop and draw a pencil around the inner and outer perimeters. On the drawing and on the jumpers of the legs, make markings, drill the sockets and hammer in the dowels, as you did earlier. Now coat the joints with glue and connect the table top to the legs - the dining table is ready to paint.

Painting with stain
- Such wooden products are usually painted with wood stain, and then covered with colorless varnish so that the structure of natural wood is visible. One coat of varnish will not be enough for the table, so apply another, and possibly more, then the product will be shiny and elegant.
Conclusion
As you can see, some things can be done independently, and the price for them will depend only on the cost of materials and energy costs.
Once you learn how to make a table, you will probably move on to more complex things and eventually master the specialty of cabinetry.
How to make kitchen furniture at home - see here.


