Content
-
1 Figure one - preliminary
- 1.1 And about the tile, separately
- 1.2 About linkage mechanisms
- 1.3 We will assemble the instrument, fortunately, not for long
- 1.4 We start assembly
- 2 Finally
This is really not a problem, and indeed there is no problem at all. Fastening wall cabinets for the kitchen involves a certain set of actions, following which step by step, you you can place all kitchen cabinets on the second floor in the order and level that you is necessary.
However, before you start walking this path, you need to clarify for yourself how you plan to hang kitchen cabinets on the wall.

Rail mount.
And here there are two options for the development of events:
- First - fixing the upper kitchen cabinets in one line. This is the most common type of hitch, it is carried out by hand and does not especially require helpers;
- Second - the mount for hanging kitchen cabinets is installed at different levels (see also the article on wall cabinets for the kitchen). The purpose of this arrangement is to use the "roof" of the cabinets for decorative elements (while larger items installed on downstream sites, and smaller ones on upstream sites), or for additional load. In this embodiment, the lower part of the cabinets can form a single plane, although this is just not necessary.
Figure one - preliminary

The wall should be flat.
This is exactly how one of the Oscar-winning creators of the Russian film industry announced the episodes in his own film, and the worse we are, we also create almost a masterpiece. Therefore, we disassemble what is a preliminary, mandatory set of measures before installing wall cabinets.
Before installation, we carry out:
- All wall alignment activities. Despite the fact that now there are special adjustable fasteners, but the curves are lordos, kyphosis walls (the terms medical and mean curvature of the spine in the anteroposterior direction, although they can be successfully applied in repair practice) will not even save they;
- Completely complete the work related to the wiring of the electrical network. This includes sockets for household appliances, the wires from which can easily pass behind the lockers, and output of wiring for raster and other lamps, the presence of which assumes modern kitchen headsets;
- The walls under the cupboards should be either fully papered or painted. This step is more of a precautionary and aesthetic nature, the fact is that painting the walls after hinge is associated with the difficulties of scrubbing cabinets from possible paint drips, and wallpapering will also be accompanied by problems associated with adjusting the cut edge to a single line. And tiled tiles are very problematic to lay when the cabinets are already hanging;
- Fixing markings for kitchen cabinets. Here, despite the seeming simplicity of the event, a number of questions arise, the answers to which lie in the incorrect initial determination of the attachment point for hanging kitchen cabinets. At the same time, the main calculated indicator should not be the distance from the attachment point to the countertop, but the distance from the bottom of the cabinet to the countertop. And already based on this indicator, plus the height of the cabinet, you can determine the height for fasteners for kitchen wall cabinets.

We visualize the task.
Our advice! In many information sources, there are different figures for the distance from the countertop to the lower edge of the second tier, there is even a reference to GOST and a minimum distance of 45 cm is indicated.
Here we offer you a different approach to solving this mini problem. Focus not on ready-made numbers, but on ergonomics and convenience.
Make the calculation so that the middle of the space on the lower floor of the wall cabinet is at eye level. For those who are used to thinking in more specific categories, we inform you that for a person of average height this in the language of numbers will sound like 55 to 65 cm.
And about the tile, separately

Tiles will have to be reckoned with her Majesty.
In deciding how to fix kitchen cabinets on the wall, there is one controversial point that requires highlighting and special consideration (see also article Fixing kitchen cabinets to the wall is easy). These disputes concern the placement of wall cabinets relative to the kitchen apron, namely with or without overlap. The answer to this question lies in the plane of understanding the features of fastening the rear wall of the cabinet.
This is all we will consider:
- The first feature of the rear wall fixing is direct nailing around the cabinet perimeter. In this case, the fastening for the wall cabinets of the kitchen, namely, the grip by the fastening of a special bus (we will talk about the fastening itself in the next section) occurs with some weakening of the compression.
And to align the position, the lower edge of the cabinet needs to be brought to an additional strip, which can be both an MDF strip and an apron tile. In this case, the apron is installed unambiguously before installing the cabinets;
- Unlike the first option, there is a second option, in which the back wall of the wall cabinet is not stuffed around the perimeter, but is inserted into special grooves. With such a connection, the cabinet adheres more tightly to the wall and does not require a lower bedding.
In this case, the cabinets are hung up against the upper edge of the apron, if the apron was initially set at the level. It is possible to install an apron tile after hanging the cabinets.
Note! The kitchen cabinet mounts are adjustable. Therefore, in case of problems with the apron, deviation from a single level, you can hide a visible defect in the level by overlapping cabinets.
About linkage mechanisms
Need for adjustment kitchen cabinets arose a long time ago. Until recently, enterprising fellow citizens aligned the lockers with two strips of chipboard. In some sources, this simple but effective technique is still described.
However, there are limitations due to the curvature of the walls and the type of fastening. And to mount fasteners for hanging kitchen cabinets in the form of a bus on a chipboard strip is somehow not logical.
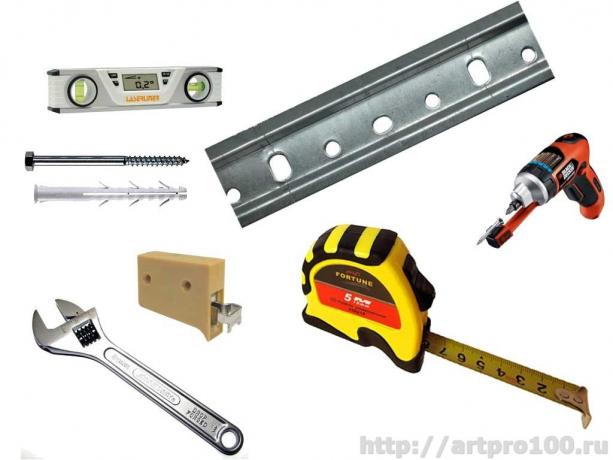
Therefore, we will consider the modern mechanism for fastening cabinets. It includes:
- The rail for fastening kitchen cabinets is a metal perforated strip of a special design, on the protruding part of which hooks of hinges are attached. Shown in the photo;

Perforations are very visible details.
- Hinges, which are attached to the walls of the cabinets and are fixed to the rail using special hooks.

And these are awnings.
Kitchen cabinet fittings have a number of advantages and disadvantages that we would like to tell you about.
So about the good:
- Unlike the great-grandfather's hinges, which were quite difficult to adjust for one person, this type fastening makes it relatively easy to set the level, mark the mounting points in the wall and make mounting. But for the hinges mentioned, you have to install one fixture, put on the cabinet, level the cabinet, mark the second place of fastening, install it, then install the cabinet, adjust the pressure of the screws, horror;
- The design of the hitch allows you to adjust the mount in height and depth. Thus, the alignment of the overall ensemble of cabinets in one plane is achieved. In trivial loops, this is impossible initially, alignment is possible only along the line and no more;

The reverse side of the fastener.
- The tire or mounting plate has fracture notches that allow it to be used to solve two problems at once, voiced at the beginning of the material. A monolithic bar of the required length, reinforced, is capable of withstanding a significant load. If you decide to place the lockers at different levels, then the segments with a minimum length of 10 cm will perfectly cope with the task;
Note! In some houses, the inner walls are very fragile, so when drilling the walls, fragments of the wall may chip. In order to avoid collapse of the entire fastening structure, it is preferable to choose through. And ideally, choose a stiffer wall.
- The method of hanging cabinets is considered fast enough and allows you to hang all cabinets in bulk, in a few hours;
- When installing a headset with a ready-made tile apron, the installation of additional leveling strips is not required, but on classic hinges, such a need arises quite often. And this, in turn, requires additional drilling, dowels and everything connected with this.
And now about the disadvantages:
- The price of the kit, of course, will be higher than the hinges and significantly higher. However, the fact that with this kit you will install the entire headset in one evening, you can aligning all the lockers under a single level says that this item can be considered conditional disadvantage;
- No matter how hard you try, there will be a gap between the cabinet and the wall in the upper part in which both dust and dirt can accumulate.
We will assemble the instrument, fortunately, not for long

The right set is fast assembly.
Yes, we really don't need a lot of tools, especially since the hinge itself is not difficult to decorate a Christmas tree.
So let's put together:
- A hammer drill, or a drill, or a screwdriver - all these tools are collected together for one purpose, different materials for walls require not only different drills, but also machines of different power. Naturally, the screwdriver will not take a reinforced concrete wall, and a puncher on a tree will look too hussar;
- Roulette, long level;
- A screwdriver in the context of screwing self-tapping screws (a purely symbolic figured screwdriver);
- Hammer and markers.
Well, and more about fasteners:
- Screws for hinges, self-tapping screws for the bus;
- Directly fasteners: a rail of the required length, two hinges per cabinet;
- Inter-section ties, they are designed to fasten the lockers together into a single, complete ensemble, while the number of ties can be from two to four for each connection.
We start assembly

We start collecting from the corner.
And now the assembly instructions in all their glory:
- By tightening the adjustment screws, we will set the canopy hooks into a single position. Average is recommended.
- We will fix the awnings on the inner surfaces of the cabinet walls in such a way that the fastening for kitchen cabinets in the form of a clutch hook protrudes a few millimeters from the back wall.
- On the wall, using a level and a marker, mark the location of the bus or its segments.
- Having drilled holes in the wall, we fix the bus on the wall using dowels and self-tapping screws or screws.
- We hang the cabinets on the mounting plate (rail, bus, whatever you like, in general, on the base).
- Using the canopy adjustment elements, we align the lockers on the plane and with each other.
- We fix the aligned boxes to each other. In this case, clamps can be used, but then between the part of the cabinet and the parts of the tool, it is necessary to lay a dense soft material, or wood, in order to prevent damage to the material.
- Using a screwdriver with a drill, we drill the joints between the cabinets. When drilling, material chips are possible; this can be avoided in two ways:
- The first is to press a block of wood as tightly as possible with a clamp to the surface of the partition from which the drill will come out;
- The second is to use drills with different diameters, from smallest to largest.
- With the help of ties, we attach the hinged structures to each other.
- We hang the facades.

As a result, everything falls into place.
Finally
How to fix kitchen cabinets is no longer a question, the final video touches - and an oil painting.