Content
-
1 Project creation
- 1.1 Next step: counting and selecting materials
- 1.2 What you should pay attention to
- 2 Ready product
- 3 Conclusion
Today it has become much easier to purchase any building material: there is a wide range of goods for furniture in stores. Support services also appeared: sawing chipboard sheets, gluing edges to ends. To create a kitchen set with your own hand, only the correct instructions are not enough. Although, after reading this article, you will have it.

It is on these drawings that people create their masterpieces.
Project creation
You need to start by measuring your workspace. This is an important part, since the future design depends on the dimensions of the kitchen room.
Read a helpful article Small kitchen design - interesting ideas.
All that needs to be measured is the length of the wall on which the kitchen will be located (if it is angular, then measure the two walls), and also mark all the sockets and water pipes. Where the pipes are located depends on where the cabinet for the sink will be.
Further according to the plan, if you decide to make a sketch with your own hands:
- Take a piece of paper, a pencil and a ruler.
- Draw a kitchen area.
- Based on the standard dimensions of the cabinets, place the cabinets in the room. Standard dimensions: height of the base cabinets 720 mm + 100 mm legs and + 40 mm table top, depth 520 mm. The dimensions of the upper cabinets are not limited in height: depth 300 mm, width no more than 800 mm, minimum height 250 mm.
Remember! Strongly massive top cabinets will crush in a small room, so try to fit them harmoniously into the space.
- On the blueprint, mark where you will have shelves, drawers, and lifting gear.
Next step: counting and selecting materials
The basis of the kitchen set is laminated chipboard, it harmoniously combines price and quality. There is also a cheaper option, for example, plywood, but it needs to be trimmed, and it is a little heavier than chipboard.
The back walls are usually made of fiberboard. Today, hardboard is produced with a painted surface, which allows it to be matched to any material: there are wood shades, there are also monotonous colors.
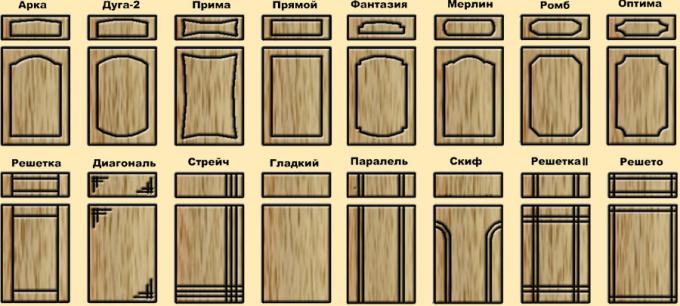
The choice of material for the doors (facades) will take the most time. There are several options, each good in its own way:
- The easiest way is to make cabinet facades from cheap chipboard. Pick up a shade of contrasting base of the headset and frame them with a colored edge.
- Painted MDF can be used, but this can be expensive. Outwardly it looks very stylish, there are many color variations. The following photo shows MDF kitchen facade.

The only drawback of the paint is that any rough contact leads to chipping.
- The most expensive way is to order natural wood. Of course, it is both environmentally friendly and beautiful, but very expensive. Plus, for natural materials, you need to monitor the humidity and temperature in the room.
After you have decided on the material for the facades, you should calculate the amount of materials required for the base of the kitchen set.
More information in the article Kitchen facades: we understand the types.
There are three ways to do this:
- Contact a special organization that will make you a 3D kitchen project for an additional fee. You will also be provided with detailed information on furniture components.

3D project of your future kitchen
- Install a special program for counting materials into your computer.

You can do this kind of beauty yourself using a computer program.
- Draw the cutting yourself, starting from the standard sizes of laminated chipboard sheets: 2500x1830 cm, 2800x2070 cm and 3500x1730 cm, the optimal thickness is 16 mm.
Note! Be careful, it is necessary to take into account all the details for each cabinet: side walls, bottom, ties, removable shelves, hard shelves, rear walls (if necessary) and stiffeners.
What you should pay attention to
- Base cabinets, especially sinks, should not have a rigid back wall. Otherwise, it will block access to the pipeline.
- Use stiffeners as little as possible on top cabinets to lighten the structure.
- Don't design large bollards that are difficult to move. Recommended sizes up to 800 mm in length.
Ready product
Well, now let's go directly to the study of the structure of the future product, or how an ideal kitchen floor cabinet with a countertop should look like.
Let's take a look at a cabinet with dimensions of 720x600x520 mm as an example.
- Initially, the frame should be assembled from the following elements: the bottom of the cabinet 600x520 mm, two side walls 704x520 (704 + 16 material thickness = 720 mm), two screeds 568x60 mm. Ties are installed between the side walls, therefore 600 - (2 * 16) = 568 mm.
- Let us provide that the curbstones have one drawer, the front of which is 147 mm, and the door is 567 mm. There is a removable shelf behind the door, its dimensions are 566x515 mm. Such uneven dimensions are associated: at the doors - with the required 3 mm gap, at the shelf - so that it moves freely inside the cabinet.
- Having assembled the frame, we attach four legs to it. It is best to place them closer to the corners.
Note! If you use a base that will hide the legs of the headset, you should drown them 5 cm or more (no more than 10 cm) so as not to rest against it.
- Now the accessories are being installed: drawer guides. The method of attachment depends entirely on the type. Conventional roller guides are installed closer to the lower part of the facade, metaboxes (kitchen fittings) are installed closer to the upper part of the cabinet.

Fixing to the table top takes place at the very last stage
Instructions for attaching components should usually come with them in the kit, but if it is not there, then do not despair, on the Internet you can always find the answer to any question.
- For a removable shelf, special shelf holders are installed: the side walls are drilled 5-6 mm deep under them. Shelf supports are easy to insert and provide a secure support.
Important! They should be marked according to the construction square to avoid unevenness.
- After that, the facades are hung, it is better to start from the top, so the box lid is put first. With an indent of 3 mm, the door is attached to the furniture hinges.
- If the cabinet stands separately, then a tabletop is placed on it, which is attracted by self-tapping screws through the upper slats (ties). If there is more than one cabinet, then it should be fixed with adjacent cabinets using furniture ties.

A cabinet with a sink may look like this; to fix the sink, the fasteners that are sold with it are used
- The last step is to install the handles. It is better to place them vertically on the doors, and horizontally on the boxes.
A few final recommendations:
- All products that will be cut for water pipes must be treated with silicone sealant to reduce the risk of swelling.
- Don't use cheap Chinese hardware: they have a short lifespan.
- When ordering cutting laminated chipboard in a furniture organization, carefully inspect all the details for chips. According to GOST, 1 mm rare potholes are allowed at the ends.
Conclusion
Remember, no one limits you in anything, complete freedom of choice. The most important criterion to be guided by is cost. And if any option suits you completely, then feel free to decide. Furniture should create comfort, not just a functional part of the room.
At the end of the article there is a video: kitchen floor cabinets with a countertop. It will be useful for novice "homemade" to get acquainted with the information.


