Content
- 1 Return from the past
- 2 Detailed instruction on a homemade bench
-
3 Wooden bench
- 3.1 The working process
-
4 Bench base - laminated chipboard
- 4.1 The working process
- 5 Conclusion
Many items that were previously considered as such, but were gradually ousted from everyday life, have become an attribute of modern cuisine. These forgotten "accessories" include a bench. Yes, yes, that's exactly what you thought. Just do not remember the images of wooden rickety products, they were replaced by new practical and stylish seats. For example, a kitchen bench with a grocery drawer has become popular.

The bench performs many functions, in particular, it can become a storage for dishes and household appliances
Return from the past
Until recently, kitchen benches were in use, but since time more practical chairs have supplanted them, providing space only in the country and outside the city. This is primarily due to the space that they occupy, because, you see, the bench is a rather bulky product. Wooden chair for kitchen
it is easy to slide in, and when it is folding, it does not present any obstacles at all. The same can be said for stools.Why did the benches return to kitchen, especially in a country house? Of course, the return was influenced by spacious rooms, in which even two, or even three benches can be placed without harm. However, they began to perform a different function, and outwardly they absolutely changed.
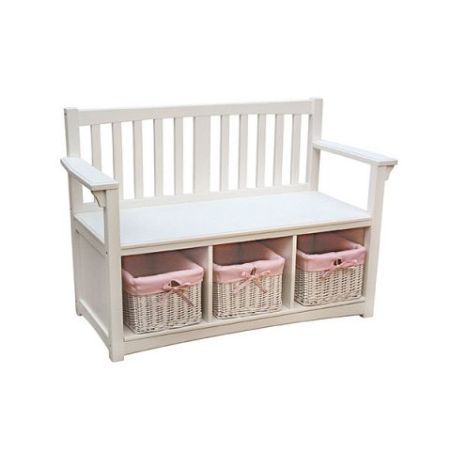
The photo shows a modern bench.

Modern kitchen furniture cannot be compared to what was offered before
- First of all, the sofa bench for the kitchen serves as a place where you can sit comfortably and comfortably, have a cup of coffee, and have a tasty lunch.
- It also has roomy boxes for storing any accessories. It is not necessary that it will be kitchen utensils; various "trinkets" and "trinkets" can be stored there.

Baskets function as drawers without any complex mechanisms
The question arises, is it possible to create such a miraculous sitting with your own hands? Of course, this will require a tool, but how can those who want to build something wonderful be stopped by the absence of a drill or screwdriver? And buying tools today has become much easier than a few years ago.
Detailed instruction on a homemade bench
If you do not know from which side to approach the solution of our question, then we will tell you - to choose the model you like.
- The most important thing is that what you like fits kitchen interior design.
- Think realistically - some materials cannot be processed at home, so you should avoid silk seats and carved inserts.

Such a product can only be purchased ready-made, although if you know how to handle a milling tool, why not try
As for the materials, the choice is not too big, the bench can be made either from natural wood, or made from chipboard, which is much easier.
Each of the two options is good in its own way, so we'll look at both.
Wooden bench
The very first stage is the preparation of the necessary tools and materials.
- Wooden boards 30x100 mm.
- Wooden bars 50x50 or 70x70 mm.
- Nails.
- A hammer.
- Brush or roller.
- Varnish and paint.
- Manual plane.
- Hacksaw or jigsaw.
As you can see, in order to get a high-quality wooden bench for the kitchen, you will have to acquire a little improvised means. In any case, the price you will spend on purchasing the ingredients described above will be significantly lower if you buy a ready-made bench.
The working process
- Initially, it is necessary to process all the boards with a plane. You should have a smooth surface.
- Take a hacksaw in your hands and saw off the bars so that you get four identical legs.
- Also saw off the horizontal bars from the bars.
- Prepare the boards that will function as a seat.

Before sawing the boards, use a square and draw a straight line
Note!
For example, let's take dimensions 1 meter long, 46 cm deep and 40 cm high.
This is a small bench in the kitchen, you can take arbitrary sizes, do not forget that long products must be installed on 6-8 legs.
Now you should have the following dimensions: 4 bars of 40 cm each, 2 bars of 80 cm (5 cm indent from the edge), 4 bars of 30 cm (depth = 46 - (2x5 + 6), where 6 is the indent from the edge).
You should also get 4 planks by the meter.
- Initially, we fasten the frame from the bars with nails. Drive them so that the caps are recessed 1 mm into the material.
Note!
Hitting with a hammer can damage the surface of the bar, so use a thin metal tube that matches the diameter of the nail head, maybe a little larger.
- Now punch the boards in the same way, there should be a gap of 2 centimeters between them.
- When the straight bench for the kitchen is completely ready, it is necessary to treat it with an antiseptic and let it dry. Then varnish or paint.
This concludes the instructions for making an ordinary wooden bench for the kitchen. Please note that no special effort or excessive investment is required from you, a bench for a kitchen made of wood is easy to create, even for the first time in life.

You can fasten the legs together in different ways, the main thing is that it is reliable
Bench base - laminated chipboard
Well, now let's start building a chipboard structure with two drawers.
Here's what we need:
- Chipboard details sawn to size and with an applied edge: two side armrests, a back wall-back, a middle pillar, a seat, stiffeners.
Note!
You can make all the blanks yourself with a jigsaw, but this will take much more time and effort. And it will be more problematic to apply an edge to uneven edges.
- Two sets of drawer rails.
- Two handles.
- The material is the basis of the soft seat.
- Skinny material.
- Screwdriver.
- Drill.
- Furniture stapler. The stapler can be replaced with a hammer and special furniture nails, for whom it is more convenient and easier.
- Roulette and construction square.
All this is necessary to get a high-quality bench sofa for the kitchen, which will serve you for several years and will delight you with its appearance.
The working process
- Initially, it is required to drill all the details. For this, two or three holes are made in the side armrests at the required height, the indent from the edge is arbitrary.
The standard height of a bench for a kitchen with a drawer is no more than 50 cm, we will take as a basis the usual 40 cm. In the part that plays the role of a seat, we make end holes, as in the side walls. - Also in the seat we drill two holes in the center for installing the B-pillar. The stand will act as a support and wall for attaching the drawer guides.
- The first step is to attach the middle pillar to the seat.
- Then we fix the foam rubber with a few drops of glue in the corners and stretch the fabric. Cut off excess material with a sharp knife.
- We collect everything that we have and make markings for the back wall. It is desirable if it is mounted just below the seat, and the upper current is located 15-20 cm above the armrests.
- We fix the rollers for the boxes with self-tapping screws. Installation instructions for roll-out guides must be included with the mechanism.
If you did not find one, you should look on the Internet how the fastening is carried out.

Roller guides are attached to the bottom of the box and to the sides, at a distance equal to the height of the box
- The boxes are assembled as follows: two walls are drilled directly into the end (drill 6 mm), two walls must have holes at the edges (drill 8 mm). The bottom of the box is usually fiberboard or a thin sheet of plywood.

The front part of the drawer can be without an edge; an overlay with a handle is applied on top of it
Conclusion
Now you know how you can independently build a bench for your home, while saving money. In any case, a handmade product will be much cozier and more comfortable than a purchased product.
To get acquainted with the process from the visual side, we suggest that you study the video: benches in the kitchen, which we attached to the article. We hope that the above information was useful and interesting.


