Content
-
1 Stages of work
- 1.1 Preparatory stage
- 1.2 Manufacturing and assembly of structural elements
- 1.3 Installing the assembled product
-
2 Alternative way
- 2.1 Preparation
- 2.2 Idea number 1 - using photo wallpaper
- 2.3 Idea number 2 - giving the effect of antiquity
- 2.4 Idea # 3 - mirror paper
What do you do if you need a new kitchen cabinet? Go to the store and buy it? Fine. But there is another way to solve this problem.
You can make this part of the kitchen unit yourself. Do-it-yourself kitchen cabinets are assembled by many home craftsmen. We will tell you how to do it right.

Homemade kitchen cabinet
Thanks to a competent approach to manufacturing, the finished cabinet will delight the eye with its appearance. And, of course, it will serve its masters faithfully for a long time.
Plus, making your own cabinet can save you money. And they, in turn, can be directed to further improve the interior of the kitchen or other needs.
Stages of work
The entire upcoming process of how to make a kitchen cabinet with your own hands can be conditionally divided into three main periods:
- Preparatory stage;
- Manufacturing and assembly of structural elements;
- Installation of the assembled product.
Preparatory stage
The very first and most important point of all work is design. Careful study of this issue will save you from unnecessary mistakes. And besides, it will avoid wasting extra time on fixing them.
In addition, do-it-yourself kitchen cabinets are made for a long time of use. Therefore, this issue must be taken very seriously.
We design as follows:
-
First of all, we determine the exact location of our future product;

Choosing a place for installation
-
Then we calculate the total size of the object and the dimensions of individual parts of the design being developed. Moreover, the dimensions are not only the width and length, but also the distance between the shelves and their number.
When analyzing these indicators, it is best to make a drawing on A4 sheets. This will make it clearer and clearer. You will have a clearer idea of what kind of kitchen cabinet - made with your own hands, you will eventually succeed.
- You also need to decide on the color of the future. cabinet for kitchen. There are many different options. But the most common are: "Oak", "Beech", "Alder" and "Maple". But if you wish, you can order chipboard and any other color from those that are in the catalog.
Then we purchase the necessary materials and tools:
- chipboard sheets;
Advice!
We recommend giving preference to laminated chipboard (laminated chipboard), 16 mm thick. It is easy to clean, has a pleasant appearance and, moreover, its price is low.

Various colors of chipboard
- special edge for gluing to laminated chipboard with an iron;
- electric jigsaw;
- sandpaper;
- drill;
- yardstick;
- iron;
- level;
- stationery knife;
- drills - you need three of them: 7 mm in diameter, 8 mm, and 4.5 mm;
- Euro screws - 50x7 mm and 40x4.5 mm;
- suspensions;
- self-tapping screws.
Manufacturing and assembly of structural elements
When the drawing is ready, we proceed to the manufacture of individual parts. To do this, you need to cut them out of a solid sheet. It is better to entrust such work to specialists. It is quite difficult to do it on your own with high quality.
The problem is that if you cut the chipboard at home with a jigsaw, chips form at the cut points. Therefore, it is better to order a cut according to your drawing in the place where you will purchase the building material itself.
In the case when this option is not possible, we do the following. We mark the chipboard. And we draw two lines. One - exactly in size, the second - one and a half millimeters wider.
Between them, carefully make a cut with a jigsaw. The resulting chips are carefully cleaned with sandpaper, running several times along the edges.
Now let's move on directly to how to assemble a kitchen cabinet.
We drill through holes in the side elements (walls) for Euro screws. We do this with a 7 mm drill at a distance of 40 mm from the edge of each vertical workpiece.
In the horizontal element (shelf) we drill holes at their ends. We use a drill with a diameter of 4.5 mm. The hole depth is 40 mm. With the same drill we make holes in those places of the side elements where the shelf will be attached.

We drill holes in the ends
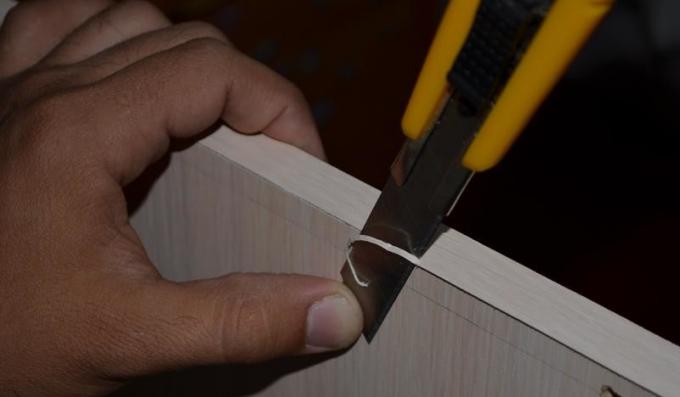
We glue the visible ends of the parts with a special edge using an iron. We set the temperature on it as for wool. We cut off the excess formed at the edges of the ends with a clerical knife.

Cutting off excess
After that, we take the side parts and, with the help of euro screws, fasten the upper and lower bar of our kitchen cabinet. Then, also, with the help of euro screws, we attach the shelf inside. At the end of the assembly, all that remains is to attach the back wall.
Installing the assembled product
This is the final step that our instructions provide. During it, we do the following.
We fasten the suspensions to the back wall of the product using self-tapping screws. Then, using the building level, we mark the places of future fixtures on the wall.
We drill holes in them. We insert dowels into them and wrap the screws inside. After that, you can hang the assembled object.
If something remains unclear for you in this process, then watch the corresponding video on our website. In it you will find all the necessary explanations.
Alternative way
There is another way to get a new one in your kitchen Kitchen Cabinet. And moreover, to do it with minimal cost. This way is the restoration of the kitchen cabinet with your own hands.
Preparation
We present to your attention several original ideas. With their help, you can update the interior of the kitchen, making it bright and special.
But, as in the previous case, before starting work, you must carefully think over everything and prepare for it. Cabinets should be cleaned of dust, dirt and old paint. Reinforce loose connections if necessary.
Idea number 1 - using photo wallpaper
Having been undeservedly forgotten some time ago, photowall-paper returns to our everyday life. Nowadays, images of cities that resemble a view from a window have become especially popular.
It could be an Italian cathedral or the Eiffel Tower in Paris. This option will be quite appropriate in the home kitchen.
Sequence of work:
- We clean the surface of the cabinet with sandpaper;
- We paint the cabinet with white paint;
- We glue the photo wallpaper to the prepared surface.
You can use a simplified version of this idea. Just take and glue our headset item with self-adhesive tape.
In this case, it is important to choose the correct color and carefully perform the gluing itself. This is what should be roughly the result (see. Photo).

We use self-adhesive film
Idea number 2 - giving the effect of antiquity
This trendy effect can be achieved with curly planks and paint.
Sequence of work:
- We measure the desired length and cut off the strips;
- Using glue, we fix them on the walls of the cabinet;
- After waiting for complete drying, paint the glued boards.

Antique style kitchen cabinet
Idea # 3 - mirror paper
The next way to update kitchen cabinets is to use mirror paper. With its help, an interesting effect is obtained, sometimes giving amazing results.
To process the headset, in addition to the paper itself, you will also need wallpaper and interesting pens. We will install them on the doors instead of the old ones.
Sequence of work:
- We process the surface with sandpaper and paint;
- We glue the side walls with wallpaper;
- We glue mirror paper on the shelves and doors;
- We fasten new handles.
Besides the above, there are other interesting ways to upgrade your kitchen cabinets. They can be decorated with stickers featuring flowers or coffee beans. The latter will especially delight coffee lovers.

Cabinet decorated with a sticker with a pattern
Advice!
When restoring, consider the proximity to frying surfaces and water. Use special waterproof paint if necessary.
Alternatively, avoid using wallpaper that can deteriorate from exposure to hot air.
We have considered the issues of creating a new cabinet and the restoration of an existing headset. The price of the issue in both cases is much lower than what would have to be paid for new furniture. Moreover, in our case, we managed not only to save money, but also to acquire full reason to be proud of the results of our work.

