Content
-
1 Preparation for repair
- 1.1 Single-lever mixers: causes of malfunctions
- 1.2 Replacing the gasket
- 1.3 Replacing the cartridge
-
2 Fixing a mixer equipped with two taps
- 2.1 Oil seal repair
- 3 Replacing the gasket
If you do not want your kitchen to be flooded with water from a leaking faucet one "fine" day, we advise you to study the device and repair of the kitchen faucet. And even if this knowledge will not be useful to you for a long time, it is still better to spend some time gathering information and acquiring skills than at a critical moment hoping for a quick visit from a plumber.
Moreover, the task before us is not particularly difficult, because almost everyone can perform an elementary repair of a tap in the kitchen!

A faulty mixer can be repaired!
Preparation for repair
Before you start fixing kitchen plumbing, you need to complete a small list of preparatory work:
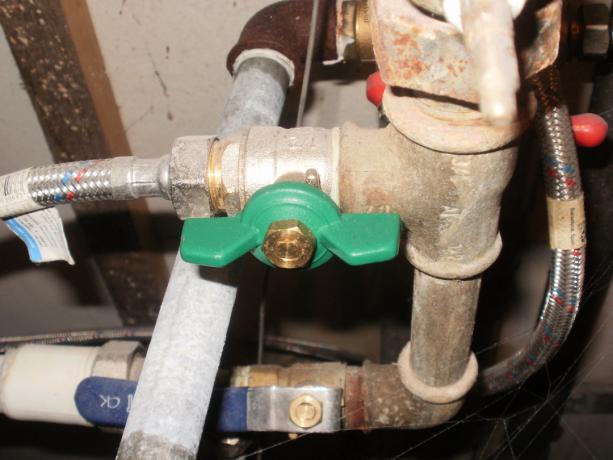
Shut off the valves before starting work.
- To prevent our kitchen from being flooded with water when dismantling the tap, we shut off the hot and cold water supply valves. Opening the tap, drain the remaining water from it.
- When the mixer is dismantled, water will inevitably pour out of it, which will also need to be collected. To do this, we substitute a low basin under the place of work. You also need to prepare a rag with which we will wipe up spilled water.
- To make it easier to repair a kitchen faucet with your own hands, we find instructions for the model we have installed. If there are no instructions, it's also okay, we'll figure it out in the process!
- We lay out the tools in a convenient place. We need an adjustable wrench, a wrench and a screwdriver.
When everything is ready, you can start troubleshooting.
Find out also about what kitchen hoods are.
Single-lever mixers: causes of malfunctions
We will begin the description of the repair algorithm with one of the most common types of kitchen plumbing - single-lever taps. Before starting work, we carefully examine the device itself in order to find out the cause of the leak.
If the faucet is leaking in the kitchen, then most often:
- Either the case is damaged (then a crack or a hole can be seen with the naked eye);
- Or the inner gasket is worn out.
In the first case, the crack can be temporarily repaired with a composition of the "cold welding" type, but this measure is temporary, and the device will still have to be changed.
But if the body is intact, then the matter is most likely in the gasket. In this case, the restoration of normal operation of the mixer is quite possible!
Replacing the gasket
In order to replace the gasket, dismantle the crane:
- First, using a screwdriver, we lift and remove the decorative cover, which some models are equipped with.
Note! The casings are often made of a rather fragile material, so care must be taken when removing.
- After removing the casing, unscrew the nuts on the body and dismantle the mixer.
- We remove the worn out gasket and replace it with a similar one, after which we screw the fasteners and return the crane to its place.
This repair method is suitable for faucets installed on the wall and connected directly to the pipes coming out of the wall. But with the models built into the sink, you will have to tinker a little more.

Dismantling the mixer
Replacing the cartridge
The most problematic place of the built-in mixer models in the sink is the ceramic or metal cartridge. When the cartridge wears out, the faucet stops "holding" and constantly drips, and if the troubleshooting is not done in time, it starts to flow quite intensively.
In this case, repairs can also be done by hand:
- We pry off the cover of the lever and lift it, revealing access to the fastening screw (see. Photo).
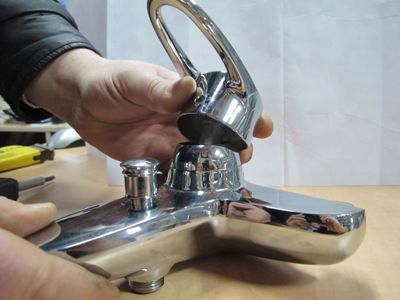
Removing the lever
- Unscrewing the screw, remove the lever, and then unscrew the cartridge fasteners.
- When the fasteners are removed, we unscrew the cartridge from the thread, being careful not to damage it.
- As a rule, a failed cartridge cannot be repaired, therefore the easiest way to solve the problem facing us is to replace this part. Moreover, a fairly affordable price allows it.

Replacement cartridges
Advice! When purchasing a new replacement cartridge from the store, take the old one with you so you can be sure that you are buying the right model.
- We install the new part into the body, after which we assemble the mixer in the reverse order.
The whole process of disassembling and assembling single-lever kitchen faucets is shown in the video.
Find out also about the types and features of fixing kitchen sinks.
Fixing a mixer equipped with two taps
Oil seal repair
Kitchen faucets equipped with two taps are today a little less common than lever faucets. Moreover, the repair of such devices is also quite simple:
- The most common reason for such a valve leak is the wear of the oil seals. To eliminate this problem, it is enough to tighten the fastening nut until it stops.
- If the nut is tightened and the problem persists (i.e. the valve is still leaking), then this indicates a strong wear of the stuffing box. In this situation, the solution is to replace it.
- First, using a wrench or adjustable wrench, unscrew the union nut.

Gland seal
- After removing the nut from the valve, we remove the sleeve from the body, on which the oil seal is located.
- Having taken out the bushing, we put the sealing gasket into the gap, wrapping the rod in even turns. As a seal, you can use a special tape, or you can use tow soaked in machine oil.
Note! When winding the oil seal, be sure to make sure that the clearance remains sufficient to accommodate the oil seal sleeve.
- We return the bushing to its place, after which we fix it with the union nut.
Replacing the gasket
Also, repairing kitchen faucets may require replacing the gasket. For this:
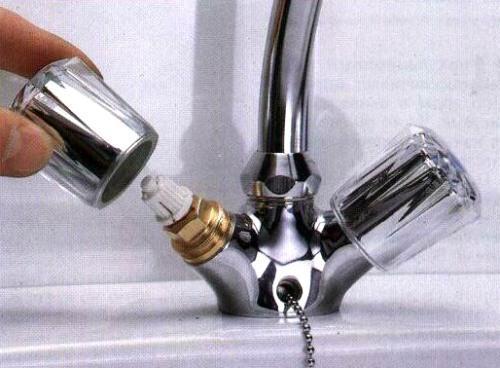
Removing the flywheel
- We remove the crane flywheels from the body by removing the decorative caps and unscrewing the mounting screws.
- Having gained access to the gasket, we assess its condition. If the gasket is intact and just shifted in the nest, we align it, setting it in the correct position.
- If the gasket has become unusable, it must be replaced. In some models, the gaskets are additionally fixed with nuts - they will need to be removed and, after replacement, returned to their place.
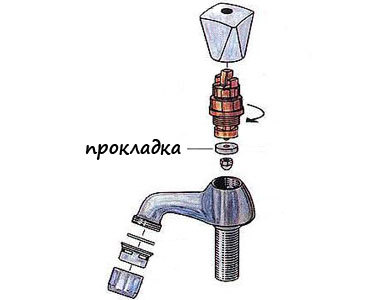
Placement of the gasket in the tap
After completing any repairs, we turn on the water supply and test our mixer. If there are no more leaks, it means that our efforts have led to the desired result!
Now you know what to do when a kitchen faucet is flowing. Therefore, you can be sure that if such a problem suddenly arises, then you will cope with it without involving outside specialists!
Read also the article "Installing a tap in the kitchen - sequence of actions."
