Content
-
1 Furniture making recommendations
- 1.1 Template
- 1.2 Roller guides and drawer dimensions
- 1.3 Fitting furniture hinges
- 2 Conclusion
If you have free time, and you want to use it to make something with your own hands, then you have opened the necessary and useful page in this regard. Here you can learn how to make your own kitchen furniture using available tools, hand and power tools, as well as lumber waste.

Learn and DIY Kitchen Furniture
Furniture making recommendations
Template
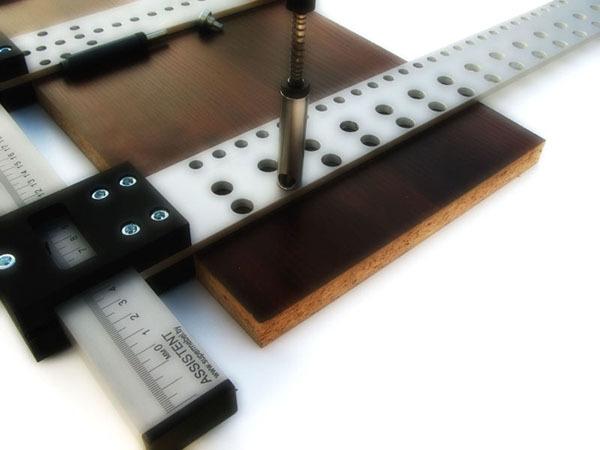
Factory template for marking furniture
- In order to make kitchen furniture with your own hands, you will not only have to cut out flat panels, but make holes in them for connecting to each other and for installing fittings. In this case, accuracy is very important, and making such measurements every time with a tape measure or a caliper is too long and inconvenient, and besides, there is a high probability of errors. To avoid such troubles, you can purchase or make yourself a template for marking and drilling holes.

Homemade furniture template for marking
- To make such a template, you will need two regular school wooden rulers 20 cm long and a school protractor. Now these rulers need to be glued together in the form of the letter T, just make sure that the corners are exactly 90 точно. Now on the riser, from the beginning of the intersection, you need to make marks at a distance of 8 mm, 16 mm, 32 mm, 50 mm, 70 mm, 100 and 120 mm, drilling holes 2 mm in diameter for a pencil in them.
- And now, let's see what these distances are for: an 8 mm mark is needed for side drilling for Euro screws or confirmations (Euros); The 16 mm mark is the thickness of the part itself, and 32 mm is the thickness of the two parts. The rest of the holes are needed to mark the awnings and retreat from the edge of the part. As you can imagine, the price for such a template will be purely symbolic, but it will function no worse than a professional one.
Roller guides and drawer dimensions

Roller guides
- You can only learn how to make kitchen furniture with your own hands if you can accurately set the roller guides for the drawers. Modern cabinets are not complete without such fittings, so let's try to derive a general formula for their installation. In addition, without accurate calculation, you will not be able to correctly install the drawers in the closet, which means that the furniture will be defective even if there is a strong and beautiful frame.

Guide pattern with hole locations
- We continue to consider the topic of how to make kitchen furniture with our own hands and take, for example, an ordinary cabinet for various kitchen utensils, which are usually found in drawers. So, let's assume that the sidewall height of our curbstone is 734 mm with four drawer fronts, h (height) of the plinth is 70 mm and the gap between the fronts is 3 mm (3 × 4 = 12 mm). Now we can calculate the height of each facade - 774-12-70 = 652 mm and divide by the number of drawers - 652/4 = 163 mm.
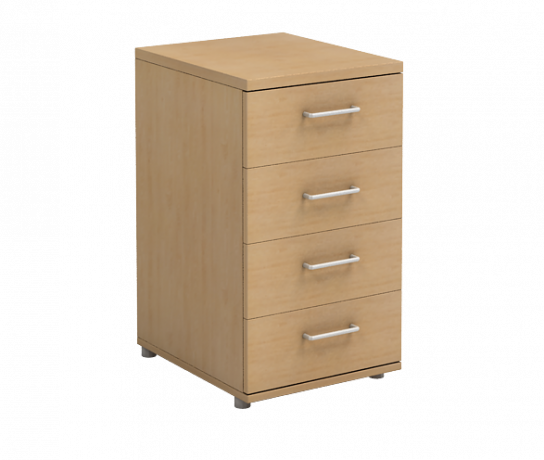
Supposed curbstone
- Considering that all boxes should be interchangeable in this case, it is necessary to take into account the extreme position of the drawer and the overlap of the front of the box with the cabinet frame. The extreme position here will be at the upper and lower drawers, where the lower facade should overlap the bottom, and the upper one - a bundle under the table top.
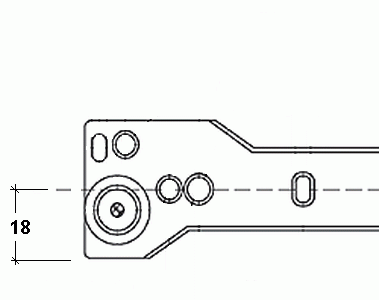
Marking the centerline of the guide
- The distance between the center line and the bottom of the guide is 18 mm, as can be seen in the drawing photo, and this bottom will coincide with the bottom of the box. The head of the screw is at most 1.5 mm thick, but we will add 4 mm, in case the facade is not 16 mm, but 18 mm. This means that the mounting height of the first rail will be 18 + 4 = 22 mm, and if from the floor, then 22 + 16 (bottom) +70 (base) = 108 mm.
- Now, having these calculations available, you can derive a constant value - 22 + 16 (bottom) = 38 mm. Let's calculate one more value - the distance from the lower front end to the bottom of the drawer - 38-18 = 20 mm. Remember that the constant for the guide is 38 mm (this is the distance from the lower end of the facade to the axis of the guide).

There is a connecting piece under the countertop on the cabinet
- Continuing to discuss how to make kitchen furniture yourself, let's calculate the height of the sides of the box and the attachment of the facade to them and start from the top. Pay attention to the photo above, and you will see a lintel under the table top, which serves to stiffen the structure, keeping the sides at the same distance. Now we need to calculate the height of the sides of the box, but so that at the same time it does not rest against the connecting bar and, given that all the facades are the same, the shuffles should be interchangeable.
- If we get a facade of 163 mm, then, in fact, the sides with a height of 50-60 mm are quite enough - the retractable mechanism will function perfectly. But if, with a low side, you pile all kinds of trifles into the drawer, then the items will simply fall out.
- The minimum distance between the connecting strap and the box body must be identical to the diameter of the roller on the guide, that is, 18 mm. So that there are no problems when the chipboard swells (suddenly this happens), add another half of the size - 9 mm and as a result we get a 27 mm gap.
- Height space for each drawer is 163 mm(facade)+3 mm(gap)= 166 mm, and we have already determined the distance from the lower edge of the facade to the bottom - 20 mm. Now let's calculate the distance from the upper edge of the facade to the top of the drawer - 16 mm(jumper)+27 mm(provided clearance)= 43 mm, but from here we remove 3 mm, which we leave for the gap between the facades and get 40 mm.
- Now we calculate the universal height of the side - 163 mm(facade)-20 mm(bottom overlap)-40 mm(upper overflow)= 103 mm with the bottom. The side of the box will end up on the bottom of fiberboard, which is 3 mm thick, which means that the net height of the side will be 100 mm. From here you can deduce formula - h(box side)= h(facade)- (20 mm + 40 mm)(lower and upper laps)- the thickness of the fiberboard for the bottom of the box.
Council. Sometimes in the kitchen, the lower drawer is made with a facade half higher than the rest, and you can also make the same cabinet. Just separate the distance for a large front (taking into account a 3 mm gap) and divide the remaining distance by the required number of drawers.
Read also the article "How to make kitchen furniture at home: a tutorial on assembling furniture."
Fitting furniture hinges

We install hinges on the doors
- We continue to figure out how to make kitchen furniture ourselves and now we will learn how to fit the hinges, taking into account all the gaps and tolerances. First of all, check if you have all the necessary tools for this job.

End mill for wood
- You will need a screwdriver and a drill, but if you have a good screwdriver such as a Makita or Bochs, you can do without a drill. But you cannot do without an end mill for drilling the canopy seat, and in this situation its diameter will be 35 mm. We also need a hammer, awl, pencil, furniture hinges with screws and a template for marking, if we have one.
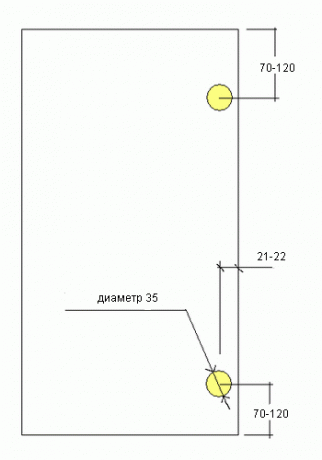
Door marking for hinge installation
- The distance from the end edge of the door to the center of the seat can be from 70 to 120 mm (this is where the template comes in handy). Depending on the size and weight of the door, the number of hinges can vary from 2 to 5 pieces, and the distance from the corner edge to the center of the seat is determined by the door thickness, and generally it is 21-22 mm.
Warning. If the number of hinges to be installed is more than two, then there is a high probability that when marking you will find yourself on a shelf or a jumper in the box. Therefore, even if it is not possible to make the distance uniform, then sacrifice symmetry so that later you do not have to reconstruct the curbstone.
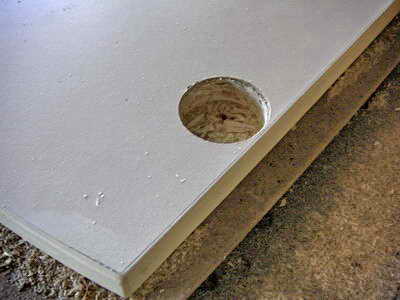
Finished hinge seat
- When marking, do not forget that you have an awl and in the center of the nest, be sure to wrap a hole for the cutter. The depth of the groove, depending on the type of hinges, is usually 12-13 mm, but considering that the panels are mainly are 16 mm thick, you must be very careful not to squeeze out the front of the door when drilling. A sharpened cutter will help a lot in this, so that you do not make much effort when pressing.
- The angle of the drill in relation to the panel should be strictly 90⁰, and put the door itself on the floor so that it does not move. After you have drilled the first groove, check it for compatibility with the hinge, and the hinge itself should fold freely beyond the edge of the door.

We fasten the loop
- Before screwing the loop into the seat, wrap the self-tapping holes with an awl through the loop ears so that the screw does not move to the side. Tighten the screws.
How to assemble kitchen furniture at home - see here.
Conclusion
In this article, we learned how to make kitchen furniture ourselves, or rather, we disassembled some of the key points necessary for assembly.
In addition to this, you can watch a video clip, visually consolidating your new knowledge.
Assembly of kitchen furniture - see here.

