Content
-
1 Start workflow
- 1.1 Fasteners and tools
- 1.2 Room preparation
- 1.3 Assembling floor-standing cabinets
- 1.4 Assembly of wall cabinets
- 2 Features of the assembly stage of the kitchen set
- 3 Installing the base (floor pedestals)
- 4 Top installation (wall cabinets)
- 5 Features of the headset installation phase
If you want to save money on the purchase of a kitchen set, then you should decide on a "risky" step - to carry out the installation of furniture yourself. Afraid you won't be able to handle it? Do not despair, our article will help you solve all the problems with the installation and assembly of furniture.
We will tell you in detail how best to carry out the installation, what you should pay attention to and help with practical advice.

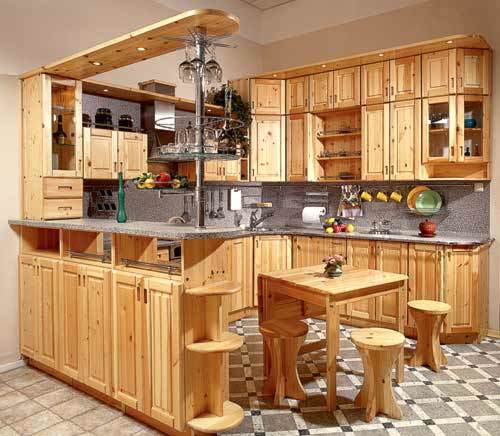
The kitchen was assembled without the participation of professional craftsmen
Start workflow
The installation and assembly of kitchen furniture begins with the preparation of the room and the necessary tools. We have indicated what exactly is needed for installation in the next section:
Fasteners and tools
- Rotary hammer with 6 mm and 8 mm drills.
- Drill with a set of drills.
- Screwdriver.
- Building level.
- Construction square.
- A hammer.
- Electric jigsaw.
- Hacksaw for metal.
- Roulette.
Note!
If you do not have any power tool, for example, a hammer drill, you can rent it from hardware stores.
This will save you from an expensive purchase, especially since it is needed only for a few hours to hang the cabinets.
When purchasing ready-made furniture, you do not have to worry about the presence of fasteners - the required number of self-tapping screws is applied to each cabinet and cabinet (see. also how to assemble kitchen furniture).
In cases where you purchased custom-made furniture and refused to install and assemble, you will need:
- Self-tapping screws for wood of various lengths: from 16 mm - for fixing fittings, up to 70 mm - for hanging.
- Fastening strip for easier and more secure hanging of the upper cabinets.

Two variants of the fixing strip
- Silicone sealant.
- Euro screw.
- Nails.
- Cross-section screeds.
The photo shows a ready-made kitchen set purchased in a store.

All lockers are laid out separately, each one is accompanied by detailed instructions
Room preparation
The next step, when installing furniture in the kitchen on your own, is preparing the walls for hanging.
It is divided into several stages, the sequence of which may be disrupted due to the fact that you already have:
- The first step is to remove the old headset.
- If you decide to update the room, then you need to dismantle the finishing materials: laminate, tile kitchen tiles, linoleum, wallpaper, plaster.
- Then - align and prepare the surface for finishing.
Advice!
An apron in the kitchen must be mandatory, it is, so to speak, a "whim" of fashion, so you should decide in advance on what material it will be.
The most practical is ceramic tiles, the cheapest is a plastic shield in the color of the countertop, the original is a glass sheet.
In the preparatory process, an important part is occupied by water pipes and sockets - they should be placed exactly where you will have a sink and an oven according to the project.

Decide in advance how many sockets you will have, and how the hood will be connected
Assembling floor-standing cabinets
This section is presented as instructions for assembling the lower (basic) pedestals.
They are divided into several types, which we will discuss separately:
-
Wardrobe with drawers. It is assembled as standard: the legs are screwed to the bottom, the side posts and ties are attached to the euro screws.
If necessary, the back wall is nailed. The boxes themselves are marked according to the technology described in the attached instructions. If one is not available, then you can look on the Internet. - Cabinet with doors. It is easier to assemble it: legs, we twist it with euro screws. If there are removable shelves, then shelf supports are inserted into the holes prepared in advance. The doors are hung at the last moment so as not to accidentally damage them.
- Combined wardrobe. The main thing is to install the drawer guides correctly.
Assembly of wall cabinets
The upper cabinets are assembled by analogy with the lower ones, with two significant differences:
- Drawers are not installed on them.
Note!
The exception is the spice drawers, but they are rarely used in small kitchens.
- Adjustable awnings are mounted in the upper corners. For them, holes are usually cut in the back wall (DVPO).
Features of the assembly stage of the kitchen set
When assembling furniture with your own hands, you should pay attention to several main points with which there may be problems:
- The base cabinet for the sink must be without a back wall. It is advisable to treat all cutouts in it with a sealant so that moisture does not damage the material.
- The legs are attached at the corners of the pedestals, with an indent of 5-6 cm from the edge.
- For bulky upper cabinets, an additional stiffening rib is used, through which the cabinet is attached to the wall. The price of furniture will not change from this, but the reliability will increase.
- It is better not to plan the bottom in a cupboard with a dish dryer, or use a rubberized cloth that will protect the chipboard from moisture.
Important!
Be careful with the ends of the materials, this is the most unprotected part, even if they have an edge applied to them. It is impossible to restore the product, unfortunately, furniture wax is powerless.
Installing the base (floor pedestals)
- Start by placing the bottom cabinets from the corner.
- First of all, the cabinet is height-adjustable, taking into account that there should be 100 mm between the floor and the cabinet for the base.
Note!
Pay attention to the dimensions of the cabinets, if the side racks are 520 mm deep, then a gap of 30 mm remains between the kitchen wall and the cabinet.
- All cabinets should be fixed to each other, and do not forget to check the level of the structure. Smooth surface required for installation countertops for kitchen.

To check the plane, use a large building level to check the plane of two cabinets at once
Top installation (wall cabinets)
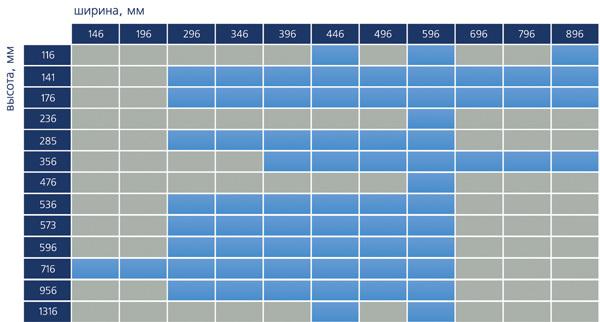
The first question you might have is what is the height of the kitchen furniture?
It is recommended to leave at least 550 mm between the worktop and the bottom edge of the upper cabinets, 600 mm is considered the optimal size.
Note!
It is under 600 mm that glass and plastic aprons are designed.
- By using a mounting metal strip and adjustable mountings for the hitch, an error of 10 mm is allowed.
- Hang the cabinets from the corner, sequentially fixing all the cabinets to each other.

Top cabinets on adjustable awnings
Features of the headset installation phase
Another important section to help you avoid all kinds of difficulties:
- Hanging cabinets on a plasterboard wall should be done using butterfly dowels, or a wooden block should be fixed under the gypsum board.
- Height-adjustable pedestal legs will allow you to easily eliminate unevenness in the floor. Therefore, if you visually see that your floor is sufficiently crooked, then it is better to purchase legs with an adjustment of 120-170 mm.

It is possible to install drawers instead of a plinth: practical for small kitchens
- When hinging doors, observe a 3 mm gap between the top and bottom of the cabinet.
- When cutting a sink hole in a plastic countertop, seal it with silicone sealant.
Now you know how to assemble and hang cabinets, as well as what is needed for these processes. A special video: installing furniture on your own should help those who still have questions and misunderstandings about the installation process.