Content
-
1 3 master classes on creating kitchen shelves
- 1.1 Open shelf in Provence style
- 1.2 Honeycomb shelf
- 1.3 Suspended shelf
- 2 Design features
- 3 What to look for before starting work
- 4 Finally
Agree, without all sorts of small accessories and utensils, the kitchen will look empty and boring. And the best place to store them will be decorative shelves. Today we will share with you information on how to choose the right design and provide 3 master classes on how to create do-it-yourself kitchen shelves.

A self-made shelf will bring individuality to the kitchen interior
3 master classes on creating kitchen shelves
It's time to find out how to make a shelf in the kitchen yourself. In this section, you will find 3 interesting master classes with which you can create a stylish design.

Thanks to our master classes, you will learn several interesting schemes for creating original shelves.
Open shelf in Provence style
This simple and at the same time very interesting do-it-yourself kitchen shelf is ideal for storing jars of cereals and cups.

To create it, you need:
- two boards 25x75 and 25x100 with any length (you choose it yourself);
- wooden handrail with a suitable diameter;
- wooden circles in diameter slightly exceeding the diameter of the pole;
- wood screws and anchors for fastening;
- sandpaper and stain;
- wood glue and decorative plugs;
- pencil and ruler;
- drill, drill for anchors, clamps;
- hammer and countersink.
When all the necessary tools are at hand, it's time to get to work.
Illustration |
Instructions for action |
 |
Markup. On the narrower plank, mark the hooks. It is better to do this from the center, moving towards the edges - this will make the hooks symmetrical. |
 |
Creating grooves. Drill holes in the marked areas corresponding to the diameter of the perches. On average, the depth of the holes should be 5-8 centimeters. Divide the pole into several parts according to the number of holes obtained. |
 |
Material handling. Sand both boards, as well as the perches. |
 |
Joining boards. Dock the two boards together at a 90 degree angle and connect them with screws and a countersink. |
 |
Installation of pegs. Pour a small amount of wood glue or wood glue into the indentations and insert the pegs into them. The perches should fit tightly into the holes, you can push them with a hammer. Check all hooks are symmetrical. |
 |
Sticking circles. Using the same glue, attach decorative mugs to the ends of the peg. This will make full-fledged hooks from them. |
After that, you will have to re-walk the surfaces with sandpaper, if you wish, you can treat them with varnish or white paint. Finally, secure the shelf to the wall using screws and a drill. Mask the hats with decorative plugs.
Honeycomb shelf
This is a very unusual option that is perfect for extraordinary people. It is good in that the resulting structures can be placed either separately or assembled into a single composition.

Making such a shelf in the kitchen with your own hands is quite simple, and we will tell you how.

Just a few wooden planks, glue and a screwdriver - and the shelf is ready
For it, you will need several rectangular boards (the number will depend on the number of shelves you want) with the same size, the edges of which are cut at an angle of 30 degrees.
Illustration |
Instructions for action |
 |
Primary processing. First of all, carefully sand all the boards with sandpaper. |
 |
Painting. It is best to treat the material with wood stain or clear varnish - they will not hide the rich texture of the wood. |
 |
Glue application. Lubricate the ends of the boards with wood glue and connect them together. |
 |
Reinforcement of fastening. To increase the strength of the structure, in addition to glue, use screws to connect both boards. |
 |
Create a hexagon. Continue with the same pattern, gluing the boards in a hexagon shape. |
 |
Attaching the mount. Simply attach the fittings of your choice to one side of the hexagon. |
Then you just have to decide how many "honeycombs" you want to see and before you hang the shelves in the kitchen, you can combine them into a single structure.
For more detailed instructions, see the proposed video.
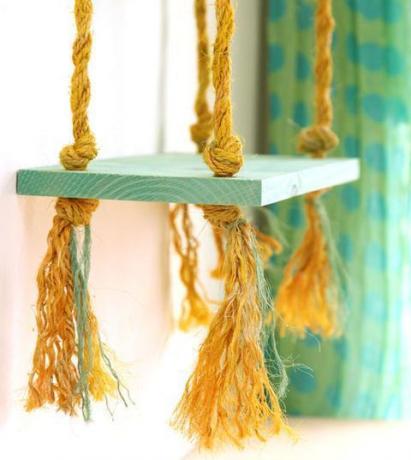
Suspended shelf
This sleek and lightweight do-it-yourself kitchen shelf will complement the interior and add a touch of playfulness to it. To make it, you only need a few wooden blanks and a decorative rope. Agree, a small price for an original product.

As a result, you will get a stylish but very simple hanging shelf for the kitchen
Illustration |
Instructions for action |
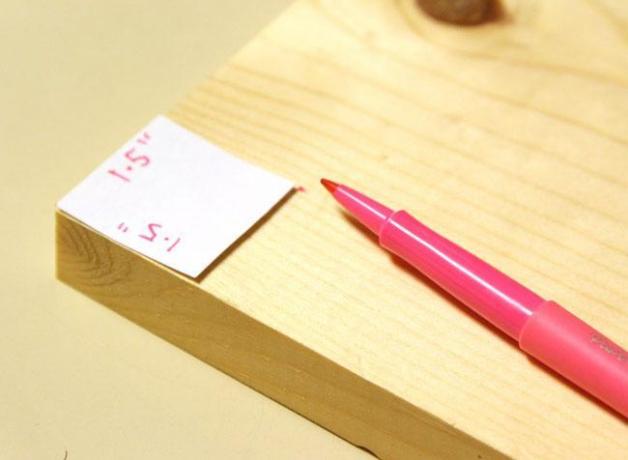 |
Marking. The most convenient way to do this is using a paper template. It should be made in the form of a 4x4 square. Make a mark at the intersection of the two diagonals of the square - this will be the place for the hole. |
 |
Making holes. To work comfortably in the future, choose a drill diameter that will exceed the diameter of the rope. |
 |
Painting material. You can treat the boards with any paint you like. For example, it can be the popular mint shade, which is shown in the photo. |
 |
Preparing the rope. Fold the decorative rope in half, step back from the fold about 30 cm. |
 |
Creating bindings. Tie a knot on each half of the rope. Thread the ends into the holes in the boards. Also create one node at the back of the board. Thus, the shelf will be securely fixed between 2 nodes. |
 |
Shelf assembly. According to the above diagram, fix a few more shelves, placing them at the selected step. Do the same on the other side of the boards. |
 |
Rope ends processing. To prevent the ends of the rope from hanging in untidy strands, dissolve them, turning them into lush tassels. |
 |
Shelf installation. Hang the resulting shelf on the wall using ordinary hooks. |
Design features
Before you hang the shelves in the kitchen, and indeed make them, you need to decide on their appearance. It will directly depend on the existing kitchen interior.
 As a basis for the structure, both wooden and plastic boards, and simple pallets The following instructions will tell you which type of structure is suitable for a particular style.
- Minimalism and hi-tech. In this case, designs with simple, laconic forms will be most appropriate. The color scheme is monochromatic, but sometimes it is permissible to use bright shades. As an addition, the do-it-yourself kitchen shelf can be decorated with LED lighting.

Simple and laconic design is characteristic of minimalism and hi-tech
- Loft or Scandinavian. Solid shelves with a slightly rough texture are perfect. Chipboard sheets, rough boards, old pallets and boxes can act as a basis for them.

The more original the materials, the better they will fit into the loft interior or Scandinavian decor
- Modern. Glass or metal accessories will perfectly complement the modern style.

Metal fasteners - what you need for modern style
- Country, Provence and Shabby Chic. Decorative shelves with metal consoles, patina, decoupage patterns or carvings as decoration will laconically fit into such an interior.
The best shelf for a country or shabby chic kitchen is a natural wood construction
- Modern. To fill it, you can use unusual lattice shelves, cork wine bottle racks, etc.

Shelf ladders will fit perfectly into modern decor
What to look for before starting work
Before you create shelves for the kitchen with your own hands, it is not enough just to decide on their style. It is necessary to take into account a couple more important nuances that affect the visual perception of the structure.

Thinking over the creation of a shelf, it is necessary to take into account its location, shape, fasteners and dimensions
- Location. Think carefully about the place in which the structure will be located. It should be easily accessible, so don't place it too high.

All the contents of the shelf must be available at any time
- The form. The most popular due to their ease of execution are structures with a rectangular shape. In addition, they are the most spacious.

Rectangular shapes are most popular due to their spaciousness and ease of implementation.
- Dimensions. It all depends on the area of the kitchen and the items that you are going to store on the shelf. The shelves for decorative accessories, spices or bottle holders can be made small. Designs that are designed to serve as a full replacement for the headset's top cabinets can be massive and located along the entire wall.

In a spacious kitchen, instead of standard shelves, you can install full-fledged shelving
- Mount. To make a do-it-yourself kitchen shelf look stylish and complete, you need to carefully choose the mount to it. It should match in color and material with the base.

Mounts should organically blend with the color and texture of the base
Finally
Do-it-yourself kitchen shelves will make the interior individual and unique. We offered you three interesting master classes with which you can create truly stylish designs. You will find more useful ideas in the photos and videos in our material.


