Content
-
1 Preparatory stage
- 1.1 Total wattage and wire selection
- 1.2 Electrical panel in the kitchen
- 1.3 Sockets and switches
-
2 Installation of wiring
- 2.1 Wall slitting
- 2.2 Wiring
- 2.3 Completion of work
One of the most difficult and time-consuming stages of repair is electrical wiring in the kitchen: in the kitchen, according to statistics, concentrated from a third to half of all electrical appliances in the apartment, which means that all of them must be provided food.
At the same time, the existing electrical network often does not meet the growing needs - that's what it is necessary to lay cables and place sockets during major repairs, as they say, "from scratch."

Layout and connection of electrical appliances
Preparatory stage
Total wattage and wire selection
Like any renovation work, wiring in the kitchen should start with planning:
- The first thing we need is to decide which network is connected to the apartment.. If single-phase is worse, if three-phase is much better, since with a three-phase network you will have a solid power reserve.
Note!
As a rule, a three-phase network is supplied to apartments in which an electric one is installed instead of a gas stove.

VVG NG cable 3x6
- The next planning step is to calculate the power of kitchen appliances.. This calculation is performed based on the information on the rated power of each device (this information, as a rule, contains the instruction manual).
-
When calculating, we should get a result within 8-15 kW. Of course, this number represents the power consumption assuming all electrical appliances are turned on, which is rare.
But as practice shows, it is better when the wiring in the kitchen has a power reserve. -
Further, according to the table shown in the photo, we select the most suitable cable. For example, if the maximum power of all electrical appliances is about 11 kW, then a copper wire with a cross section of 6 mm will be needed for laying (for example, VVG NG 3x6).
If the calculated load data is about 15 kW, then you will have to choose a thicker wire, such as VVG NG 3x10, with a cross section of 10 mm.
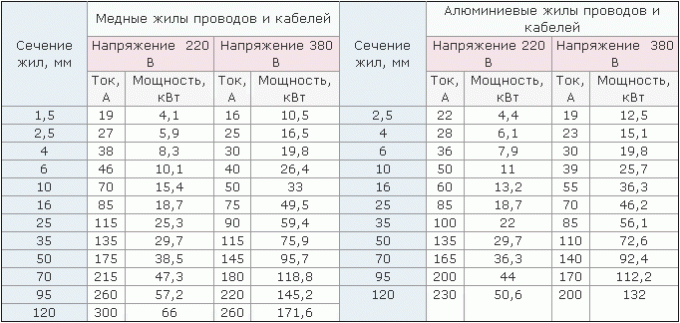
Selection of wire cross-section depending on power
Note!
Wires of the type VVG NG 2x6 or VVG NG 2x10 can be used only if the house is not connected to the grounding system, i.e. the third neutral wire is missing.
But it is better, nevertheless, to lay a three-wire cable - so to speak, with an eye to modernizing the wiring in the future.
Electrical panel in the kitchen
To make the work of an electrician in the kitchen safer and to manage the connections more convenient, you can install a small electrical panel instead of the junction box we are used to.
The installation of an electrical panel not only allows you to arbitrarily disconnect the outlet circuits from the power supply (for example, if repair is necessary), but also provides emergency protection for individual circuits (see. also the location of the sockets in the kitchen).

Typical kitchen wiring diagram with the placement of sockets and switches
- At the entrance to the panel, we install a residual current device (RCD), the power of which corresponds to the maximum total load current. For example, with a single-phase connection, a 50 amp RCD is sufficient.
- Plugs of sockets (parallel connections of no more than five pieces in each) are connected using an NG cable 3x2.5.
- We mount each loop on a separate 25 amp RCD.
- We connect the lighting circuits in parallel and connect them through a 6 amp circuit breaker. If the kitchen has both general and local lighting (for example, a spotlight built into a kitchen set), then each circuit can be connected to a separate RCD.
Advice!
Taking into account the rather high humidity in the kitchen, experts recommend instead of standard RCDs install differential machines in the kitchen panel (leakage current - 10-30 A, short-circuit current - from 6 A and more).
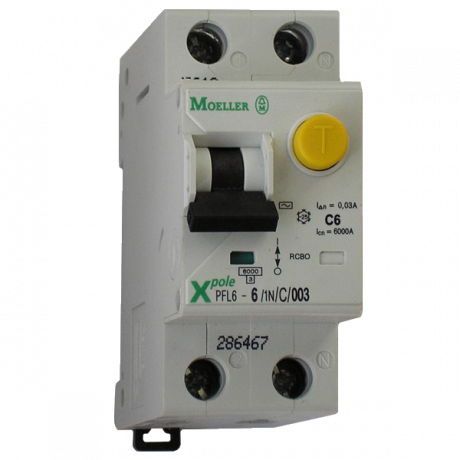
Differential automaton
Sockets and switches
Talking about how to make the wiring in the kitchen as efficient and safe as possible, one cannot but pay attention to the issue of choice and placing sockets and switches in the kitchen:
- Sockets designed for a current of at least 16 amperes are optimal for installation in the kitchen (see. also built-in sockets for the kitchen). The most durable sockets on ceramic plates, equipped with nickel-plated lamellas.
- Kitchen switches can also be designed for lower loads. In addition, choose switches that are as flat and smooth as possible to make them easier to clean during regular cleaning.
- As a rule, sockets are mounted at a distance of 30-40 cm from the floor, and switches at a height of about a meter. But for kitchen outlets, an exception to the rule should be made, namely, to install a series of several outlets exactly above the countertop. So it will be much more convenient to connect household appliances.
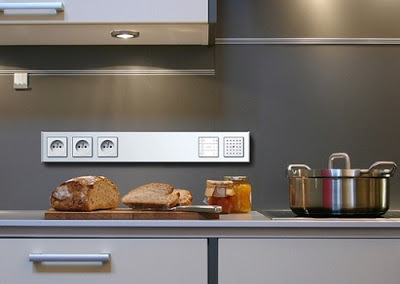
Sockets above the table top
- The optimal place for placing the switch is 10-15 cm from the door frame. If necessary, you can also install a kitchen switch in the hallway in front of the kitchen - but this is not always convenient.
- For additional lighting, it is better to make separate switches above the sink or countertop.
Note!
If you have at least a rough idea of how the kitchen furniture and objects will be arranged interior - place the sockets in the immediate vicinity of those appliances that should be connected to them connect.
So, the socket for the refrigerator can be "hidden" in the far corner, and for the kitchen TV set one socket at a height of 2 m.
Installation of wiring
Wall slitting
When the planning is completed and all the necessary materials have been purchased, the next step is the wiring itself in the kitchen: you can lay it with your own hands, but only if you have the appropriate skills and tolerance.

Wall slitting
As a rule, wires in the kitchen are laid in a hidden way, i.e. laying inside walls and masking with finishing. Most often, special channels - grooves - are made for laying wires in the walls.
The process of chasing walls and laying wires is shown in the video.
- Slitting walls is a very laborious procedure. To make strobes in concrete or brick walls, we need either a special chasing cutter or a hammer drill with a chisel attachment.
Advice!
If you are making grooves with your own hands, then instead of a chisel, you can use a 14 mm drill with a victorious tip.
At the same time, the operating speed drops slightly, but such a drill blunts much more slowly.
- Before we carry out the wiring in the kitchen, we apply markings on the walls. At the same time, we try to make the layout in such a way that the length of the strobes is minimal.
- All grooves must rotate at right angles. Firstly, it is more aesthetically pleasing, and secondly, such an arrangement of wires makes it possible to predict their location in the walls after termination. This is very useful in situations where you are looking for a place where you can drill a hole without risking damaging the wiring.
- We make all the necessary grooves according to the marking, in the places where the sockets are installed, we lay the sockets for the installation of the socket boxes.
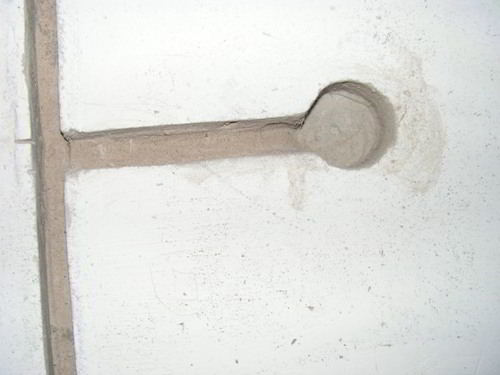
Groove with a recess for a socket
Note!
When chipping walls, you must use personal protective equipment - glasses and a respirator.
Wiring
The next step is laying the wires in the grooves.
For this:
- In the groove, every 30-40 cm we drill holes 6-8 mm in diameter.
- We tighten the wires prepared for wiring into a plastic corrugated pipe, after which we put the resulting structure in the grooves in accordance with the wiring diagram.
- Using plastic dowel brackets, we fix the corrugated pipe with wires in the holes we drilled.

Dowel bracket
Advice!
If there are no dowel brackets at hand, then you can simply hammer the dowels for express installation into the holes, and tie short pieces of wire to them. With these segments, the wire is fixed in the strobe no worse.
- After laying all the wires, we seal the grooves with a solution, finally hiding our wiring.
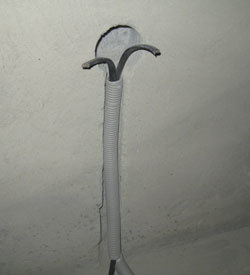
Corrugated pipe in a groove
Completion of work
At the final stage, we need to install all sockets and switches in the planned places, and then connect the wiring to the network.
- We install plastic socket outlets in the recesses made in the main wall. In the technological holes in the bottom of the socket box, we bring out the wires intended for connecting the sockets.
- Having aligned the socket with a level, we fix it in the wall with special screws, after which we seal the attachment point with mortar.
- We install the outlets themselves only after finishing the finishing work. In this case, we connect the wires coming out of the walls to the terminal blocks, fix the mechanism of the socket or switch in the socket box, and then put on the plastic covers on top.
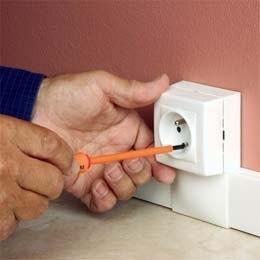
Installing the socket above the countertop
If you follow the recommendations given in the article, then do-it-yourself wiring in the kitchen can be done quickly enough, and most importantly - reliably! At the same time, you can safely turn on all kitchen appliances, without fear that the power reserve will not be enough or a short circuit will occur somewhere!
